Friday, November 26, 2010

Saturday Sketch Challenge #179


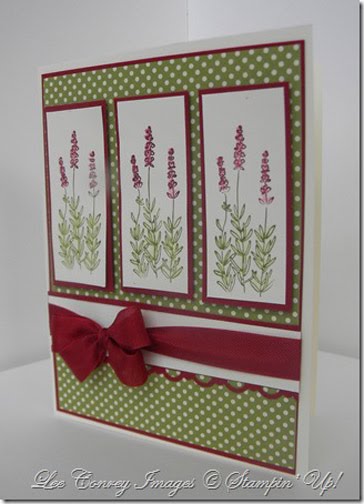
Hello everyone and welcome to a new Stamping 411 Saturday Sketch Challenge! The triptych included as part of this week's sketch offers you lots of interesting possibilities for your projects!


Here's one possible set of measurements to get you started:
  1. Layer One -- Cardbase cut at 5.5 x 8.5", scored and folded to form a card.
  2. Layer Two -- cardstock cut at 4.25 x 1.5". Punch the bottom of the strip with a Border Punch.
  3. Layer Three -- cardstock cut at 4.25" x 1". Stamp sentiment.
  4. Layer Four (for all three panels) -- 1.25 x 2.5".
  5. Layer Five (for all three panels) -- 1 x 2.25"

See, when you break it down, it doesn't really seem all that complicated, does it? We hope you'll have fun with this week's sketch -- after all, that's what it's all about! Let your imagination run free as you create your project this week!

Now, are you ready for some inspiration from the Design Team? Let's go ...

Connie Babbert


Lee Conrey


Robin Merriman


Tiffany Bauer


Now it's your turn to play along! Here's what you need to do ...
  1. Create your project and take photos
  2. Post it on your blog or other online forum
  3. Leave the linking information below - be sure and link directly to your challenge post, not just to your blog address
  4. Have fun by leaving comments for other participants and for the Operators. Everyone loves to get comments. And the more you leave, the more people will leave for you!

We hope you take the time to play along this week! We can't wait to see what you create! But don't wait too long -- our links will close at 8 a.m. Thursday morning (Eastern Standard Time).

Thanks for stopping by and have fun!


Stampers Showcase #178

WOW -- Stamping 411 has the greatest and most talented followers! You continue to amaze and inspire the Operators each week with your projects and artwork! Keep up the great work. Here are your Operator Picks for Challenge #178!

Thursday, November 25, 2010

Technique Thursday - Reflection Technique

It's time for another installment of our Technique Thursday, and today I thought I'd share the Reflection Technique with you. This scene reminds me of the gorgeous sunset I saw on my way home from work the other night...then oddly enough at a SU! party Friday night one of the guests asked me to explain how to make a reflection on a card, and this card was born!
Here's what you'll need:

Stamp Set: Lovely as a Tree
Ink: Basic Black, Pumpkin Pie, Tangerine Tango, Melon Mambo, Old Olive, Not Quite Navy, Marina Mist, Basic Gray
Paper: Shimmery White works best for sponging, Basic Black, Poppy Parade. Also a piece of white computer paper ripped in half, keep both sides. A piece of white paper punched with the 1-3/4" circle punch.
Accessories: Stamping Sponges, Clear Plastic Sheet (translucency or window sheet)


Sponge the sun by first punching a hole in a scrap piece of white paper using the 1-3/4" circle punch (or whatever size sun you would like). Hold the negative piece over your base card stock where you would like the sun to appear. I used Pumpkin Pie, Tangerine Tango and Melon Mambo to create this sun.


Add the torn piece of white paper where you would like the cut off of the trees to be (I hope you can see it in the picture!), and stamp the trees over it. Some trees will be stamped full strength, then stamp others a couple more times before re-inking the stamp to make it look like they are lighter and behind the other trees.


Now you will cover the stamped trees with the scrap of torn white paper, being sure to line up the pattern, and sponge the bottom "reflection" area, could be a pond or possibly snow? I sponged mine with Marina Mist and Basic Gray to give it a wintry pond look.


Stamp the trees repeatedly on the plastic sheet, and keep the top portion covered with the torn piece of white scrap paper, holding it in place to keep the pattern.


Flip the plastic sheet over so that the inked part is facing the card. Apply it in the correct position, hold it in place, and rub over the plastic with your finger to be sure that the ink is transferred from the plastic sheet to the card stock.


Once you remove the plastic, your image will look like this:


Next, cover the bottom reflection portion with the torn white scrap paper and sponge the sky. I used Old Olive and Not Quite Navy. **Be sure and cover your sponged sun with the punched white circle!


Here is what your image will resemble once you've finished stamping and sponging. I sometimes (I did in this case) sponge over the reflection portion again, because like any reflection, you don't want it to be a perfect copy of the image above, just a vague copy of the image. Now just add a card base and you're all set! I didn't really think this card needed anything in the way of ribbon or embellishments so I left it as-is.


I hope you'll give the reflection technique a try, we'd love to see what you come up with!

Friday, November 19, 2010

Saturday Sketch Challenge 178

Good Evening Stampers!

Another clean and simple sketch for this week's challenge to you! I love a simple layout at this time of year, when the hustle and bustle is starting and we all have less time!

So ~ some potential measurements for this week could be:

Base: 11 x 4 1/4", scored and folded in half at 5.5
Layer 2: 5 1/4 x 4.
Layer 3: 5 1/4" x 1/2"
Layer 4: 2 1/4" square
Layer 5: 2" square.

Does the thought of cutting your card stock using measurements baffle you? Well, you can check out the most awesome post on how to read a ruler written by the very lovely and talented Lee Conrey, by clicking here.

As with EVERY week, if you need to change it up, do so! You just want to use this sketch as a jumping off point for your design then let your imagination do the rest!

Without further delay, here are your operator cards for this week.
Selene Kempton


Connie Babbert


Lee Conrey


Patti Chesky


Robin Merriman


Gretchen Barron


Kerin Sylvester


Tiffany Bauer

Now it's your turn :D Never played with us before?? Well, it's easy! Sky's the limit!
  1. Make a card
  2. Post it online somewhere to your blog or other online forum
  3. Post a link to the free linky tool below (please point the link to your post and NOT just your blog)
  4. Have some fun and leave comments for each other (and for the operators if you like their work). ~ Everyone loves comments!
We hope you join us this week and play along with this sketch! But don't delay our links will close at 8AM on Thursday morning Eastern Standard Time.

Have A Great Week!
Selene~


Stamper's Showcase - #177

It's been another fabulous week of stamping at Stamping 411! Here are your Operator Picks for Sketch Challenge #177. Thanks for playing along this week, everyone! We hope you come back soon!

Thursday, November 18, 2010

Color Inspiration #144


Welcome to the Stamping 411 Color Inspiration Challenge!


This week I was inspired by the Candy Lane MDS download. As much as I love to create with my hands and getting inky, it's also fun to play with My Digital Studio on my laptop.

This week's card was completely made on My Digital Studio......Stampin' Up!s digital software for creating cards, scrapbook pages, calendars and so much more!


The colors for this week are Baja Breeze, Real Red, Blushing Bride and Garden Green.

This fun combination contains both traditional and non-traditional holiday colors!

If you do not own MDS, these colors can also be found in the Candy Lane dsp pack.

Of course, you don't have to make a holiday card. These colors would work perfectly for a fun birthday card. Imagine funky flowers in all these gorgeous colors.

The possibilities are endless! What would you make with these colors? I can't wait to see to what you come up with. Make sure to use the Linky Tool below to link the web address of your project to this post!!!

Wednesday, November 17, 2010

How to Create a Scalloped Rectangle


I’m going to show you how to easily cut a Scalloped Rectangle with your Square Scallop Die and your Big Shot.

First you will need your Big Shot, Clear Cutting Pads, Scallop Square Die and a Piece of Card Stock big enough to cover the die.

Blog Tour and How to 012 

Next you will layer your sandwich with your Clear Cutting Pad, The Scallop Die and the other Clear Cutting Pad.

Blog Tour and How to 013 

…cover die completely

Blog Tour and How to 014

Push forward and run through……………

Blog Tour and How to 016

….now you have your Scallop Square

Blog Tour and How to 017  

Insert the scallop Square into the scallop Grooves of the die to the desired width.

Blog Tour and How to 018

…the Card Stock that overlaps the edge will cut off perfectly!!

Blog Tour and How to 019

So there you have it…..an easily cut Scalloped Rectangle in seconds!!!

Thanks for stopping in and we hope you have a wonderful week.

Friday, November 12, 2010

Saturday Sketch Challenge 177

Good Evening!

It's time for another clean and simple sketch challenge from your stamping 411 Operators!

This week is super uber simple and there's a bunch of ways you can assemble a quick and simple card, that will look wonderful!

This week, Tiffany is on top, so I'm going to try and guess at her measurements, but feel free to go to any of the operator blogs to find out how they created their cards! They are certainly GORGEOUS this week!

Here are some measurements for you to try:

Base Layer: 5 1/2" x 8 1/2", scored and folded in half at 4 1/4"
Layer 2: is ribbon, but if you were using paper you could try 1 1/4" x 5 1/2" strip
Layer 3: 2 3/4" x 3"
Layer 4: 2 5/8" x 2 7/8" TIP** (rather than looking at the measurement, it's an 1/8th of an inch smaller on two sides than layer 3).
Layer 5: 2 1/2" x 2 3/4"

Does the thought of cutting your card stock using measurements baffle you? Well, you can check out the most awesome post on how to read a ruler written by the very lovely and talented Lee Conrey, by clicking here.

As with EVERY week, if you need to change it up, do so! You just want to use this sketch as a jumping off point for your design then let your imagination do the rest!

Without further delay, here are your operator cards for this week.


Kerin Sylvester


Now it's your turn :D Never played with us before?? Well, it's easy! Sky's the limit!


  1. Make a card

  2. Post it online somewhere to your blog or other online forum

  3. Post a link to the free linky tool below (please point the link to your post and NOT just your blog)

  4. Have some fun and leave comments for each other (and for the operators if you like their work). ~ Everyone loves comments!

We hope you join us this week and play along with this sketch! But don't delay our links will close at 8AM on Thursday morning Eastern Standard Time.

Have A Great Week!
Selene~