Friday, May 25, 2012

Saturday Sketch Challenge SSC257


Happy Memorial Day weekend!!!  Typically, this weekend marks the start of the summer!  The beaches open, the BBQs are firing up, the party season starts and the kids are itchin' to get out of school.  We also need to remember those in the military who have have paid the ultimate sacrifice so we could have our freedoms!!!

Every Friday at the Stamping 411, we celebrate the weekend with a brand new Stamping 411 Saturday Sketch Challenge.

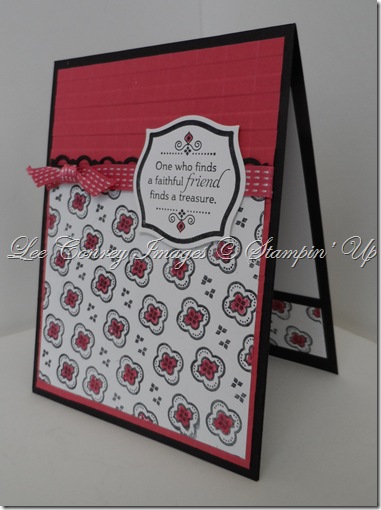
This week's sketch is very simple!!!!  As you can see from the operators' projects, there's so much you can do with this sketch.

Here are some potential measurements you could use to make a card using this sketch:

Layer #1 - 4 1/4" x 11", folded in half
Layer #2 - 4" x 4 1/4"
Layer #3 - 3 3/4" x 4"
Layer #4 - 1" x 4" 


Are you ready to play along?  We hope that you are!  Here are our rules for play.
  1. Make a card using your Stampin' Up Supplies!
  2. Post it online somewhere to your blog or other online forum
  3. Post a link to the free linky tool below (please point the link to your post and NOT just your blog).
  4. Have some fun and leave comments for each other (and for the operators if you like their work). ~ Everyone loves comments!
  5. Please note, we reserve the right to remove links with non-Stampin' Up! product, "sales pitches", links to online stores, or requests to join your team. We're here to have fun, learn from one another and share.
We hope you join us this week and play along with this sketch! But don't delay our links will close at 8AM on Thursday morning Eastern Standard Time.

Have a wonderful weekend!
Selene Kempton and Patti Chesky

Stamper's Showcase #256


Each week, the Stamping 411 Operators are amazed at the creative ideas shared and wonderful ways that you use our sketches. This week was certainly no exception! Thanks to all who played along. Here are your Operator Picks for Saturday Sketch Challenge #256!


Thursday, May 24, 2012

Blast from the Past #2

Good morning!! 

Today's post is a fun article in which I take an "old" sketch from the Stamping 411 archives, and turn it into a scrapbook page!!  Today's sketch is from Dec 25, 2009!


And, here is my sweet and simple scrapbook page!

Supplies used:
Just Perfect Alphabet Set 
Basic Black Cardstock (12 x 12;  8 1/4" x 8 1/4")
Whisper White cardstock (8 1/2" x 8 1/2";  1 1/2" x 11")
Brushed Silver Cardstock (2 3/4" x 11")
Misc:  Big Shot, Stars #2 Originals Die; Extra Large Oval Punch

The pictures are all trimmed to 4" x 4", and mounted onto the 8 1/4" x 8 1/4" Basic Black cardstock.  
Hope you enjoy it!!  

Be sure and check back tomorrow for the Stamper's Showcase!!

Friday, May 18, 2012

Saturday Sketch Challenge 256 (SSC256)

Good Evening Friends! 

I'm so excited to bring you another sketch from stamping 411!  Thank you to all that play along every week.  We get so excited to see what you'll share next!  I most always learn something from you, so thank you for that. 

Tonight, before we get started, I'd like to give a gentle reminder for you to check the rules when playing!  We love to share with you and want to keep stamping 411 a marketing free zone that you can enjoy without being asked to make a purchase.

I'm going to quote another operator here, because she's awesome with words and sometimes, I'm not:  

"As per the rules of the Stamping 411, we do not allow any advertising in any posts linked to our blog. 
The Stamping 411 was created as a safe place for all demos to send their customers to learn about stamping without worrying about having them advertised to by other demos.  We also not to agree to "market" to anyone on the 411 posts.  :)  We are just here to share what we love. "


So ~ how about some inside information.  Everyone loves to get that type of scoop! We're going to be looking to expand the design team soon and there are changes coming that are already in process!  We are very excited about some of the changes coming.  Perhaps, a new demo to highlight a new catalog?  

Have you ever thought you might like to join our design team?  Play along (just sayin').  We almost always ask people that play along to join when we are looking to add to the team.  

Okay now, enough about that... Let's play!  :)

First some potential Measurements for you to try:
Base:11 x 4 1/4", scored and folded in half at 5 1/2"
Layer 2:  5 1/8" x 3 7/8"
Layer 3:5 x 3 3/4"
Layer 4:2 1/2" x 3 7/8"
Layer 5:  2 3/8" x 3 3/4"


Are you ready to play along?  We hope that you are!  Here are our rules for play.

  1. Make a card using your Stampin' Up Supplies!
  2. Post it online somewhere to your blog or other online forum
  3. Post a link to the free linky tool below (please point the link to your post and NOT just your blog).
  4. Have some fun and leave comments for each other (and for the operators if you like their work). ~ Everyone loves comments!
  5. Please note, we reserve the right to remove links with non-Stampin' Up! product, "sales pitches", links to online stores, or requests to join your team. We're here to have fun, learn from one another and share.
We hope you join us this week and play along with this sketch! But don't delay our links will close at 8AM on Thursday morning Eastern Standard Time.

Have a wonderful weekend!
Selene Kempton

Thursday, May 17, 2012

Stamper's Showcase #255


It's been another great week on Stamping 411. Thanks to all who played along with our challenge. Here are your Operator Picks for Saturday Sketch Challenge #255!

Wednesday, May 16, 2012

"How To" Tie A Bottle Knot

Hi Everyone!
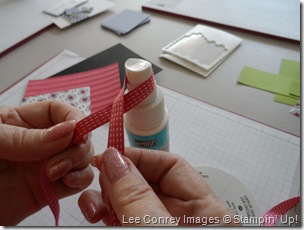
I’ve got a cool little trick for you today. It’s how to tie a Bottle Knot with your Stampin’ Mist Bottle. So get your Stampin’ Mist Bottle and follow along.
SAM_0387
  • Take your desired ribbon and bring it around the top part of the bottle. Cut end on the left. ( I do not cut a length but work from the roll) It saves ribbon.
SAM_0388
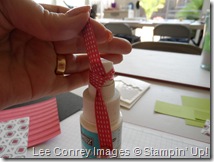
  • Cross the piece in your left hand over the ribbon.
 SAM_0389  SAM_0391
  • Bring the cut piece up through the bottom and pull straight up and down with the tails.
 SAM_0392 
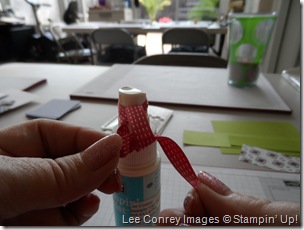
  • Now bring the top (cut end)down and tie into a knot.
SAM_0394
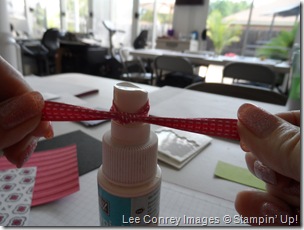
  • Pull both ends to the sides
SAM_0395
  • Pull ribbon off bottle and this is what it should look like. Loop and two ends.
SAM_0396 SAM_0397
  • Measure  to card and cut just enough to attach to the back of the mat with tape/Mono.
SAM_0399
  • Now make a cut into the loop at a diagonal
SAM_0400  SAM_0401
  • Almost there…..now pull both ends to the sides, then trim ends…..and there you have it. Attach to the back of your mat and attach to the card base.
SAM_0402
  • The Perfect very time Bottle Knot
  • SAM_0405

…and here is the finished Product.

I hope you enjoyed this tutorial. Hope you will come back soon for more inspiration form the Stamping 411 Team of Operators.

Friday, May 11, 2012

Saturday Sketch Challenge #255


Hello everyone and welcome to a new Saturday Sketch Challenge from the Stamping 411 Operators! We've got another fun sketch to inspire your creativity this week! And speaking of creativity, just wait until you see what the Operators have created for you this week!

First, here are some potential measurements for this sketch:
  1. Layer One -- Card Base -- Cardstock cut at 5.5 x 8.5", scored and folded
  2. Layer Two -- DSP cut at 4 x 2.5"
  3. Layer Three -- Cardstock cut at 2" square
  4. Layer Four -- Cardstock cut at 2" square
  5. Layer Five -- Cardstock cut at 2.5 x 3.5"
That's it! It looks more complicated, doesn't it? Are you ready to see some fabulous eye candy? Let's go ...


Have we inspired you to play along?  We hope so and can't wait to see your creations!  Here are our rules for participating:

  1. Make a card using your Stampin' Up Supplies!
  2. Post it online somewhere to your blog or other online forum
  3. Post a link to the free linky tool below (please point the link to your post and NOT just your blog).
  4. Have some fun and leave comments for each other (and for the operators if you like their work). ~ Everyone loves comments!
  5. Please note, we reserve the right to remove links with non-Stampin' Up! product, "sales pitches", links to online stores, or requests to join your team. We're here to have fun, learn from one another and share.
We hope you join us this week and play along with this sketch! But don't delay our links will close at 8AM on Thursday morning Eastern Standard Time.

Have a fabulous weekend!
Blessings, Gretchen

Stamper's Showcase #254


 WOW!!! Unbelievable stamping this week from our Sketch Challenge Participants! You guys ROCK! Here are your Operator Picks for Saturday Sketch Challenge #254.

Thursday, May 10, 2012

Clean and Simple with Negative Shape Masking

Hello everyone and welcome to my Thursday "Anything" Post! I decided to bring you a fun little technique today that I've been seeing EVERYWHERE. I'm not even quite sure what to call it so I'm calling it "Negative Shape Masking". When you "mask" a stamping project, you usually use a punch or die-cut shape, lay it on your project and stamp or sponge over it so that when you pull away the "mask", that area of the paper is left blank. With negative masking, you do just the opposite. You punch or die cut a shape and then you use the outline, or negative area, to do your masking! Clear as mud, right? LOL -- let me show you what I mean!


On this first card, using the Big Shot and the Labels Collection Framelet, I cut out the label shape and then used the outline as a stencil for my sponging.


I used adhesive tape to fasten the mask to the cardstock that I was using for my project.


 Next, I used sponges and three different colors Classic ink -- Certainly Celery, Pretty in Pink and Perfect Plumb. Sponge and apply color until you are happy with the effect -- you can use as little or as much as you want. Obviously darker colors will give you more contrast and vibrancy. Once you have it the way you want it, remove the mask and this is what you have ...


 Next, you add your stamped images, color them in and add any embellishments you want to complete your project. For this card, I used Bordering on Romance and Sincere Salutations Stamp sets and positioned them just a little outside of my sponged area. I stamped with Black Stazon Ink and then colored in the flowers and leaves with Stampin' Up! Watercolor Pencils. I blended the colors with a Blender Pen and added self-adhesive Basic Pearls for embellishment. I then trimmed the stamp piece to a size of 3 x 4" and backed it with an Elegant Eggplant mat measuring 3.25 x 4.25". I adhered that to a 4 x 5.25" piece of Whisper White Cardstock that I embossed with the Elegant Bouquet Embossing Folder and attached it to a Elegant Eggplant Card Base. Once you cut your mask, it can be used for several different projects, so don't throw them away, keep them in a little file or box for later use.


Now, you can use any shape or size for your negative mask. It's fun to experiment and these cards make very fast, simple and clean cards when you need something quick or need to make multiples! Here's a couple more examples ...


For this one, I cut out the butterfly with the Beautiful Butterflies Bigz Die. I positioned the mask at a little angle and then sponged it with Marina Mist and So Saffron Inks. I stamped the flourish from Elements of Style with Marina Mist Ink. The sentiment is from Pursuit of Happiness. I also embossed the Marina Mist mat with the Big Shot and the Framed Tulips Impressions Folder. The Card Base if So Saffron.


In this final sample, I used one of the Heart Dies from the Hearts Collection Framelets. Using the Array of Sunshine Stamp Set (Hostess), I embossed the stamps with Versamark Ink and Clear Embossing Powder. I then sponged Real Red and Rich Razzleberry inks over the embossing (this is called Emboss Resist). The sentiment is stamped in Black Stazon ink and is from the set, Word Play.

I hope you will keep this technique in mind and have a little fun creating sometime soon using the Negative Mask technique. It's a great way to add extra color, depth and texture to your cards and yet it's still quick and easy to do. Feel free to leave a link to your projects below -- we would love to see your creations. You have until 8 AM next Thursday to play along!

I hope you've enjoyed today's "Anything" post on stamping 411 and hope you'll come back soon!

Happy Stamping -- blessings, Gretchen