Friday, July 27, 2012

Saturday Sketch Challenge SSC266

Good Evening Friends!

I hope you are enjoying your summer.  Convention kicked off the week for a mini operator break to give us some time to spend with our families when the weather is so nice outside! We will resume doing "top 5" and other "how to" posts around the 1st of September. 

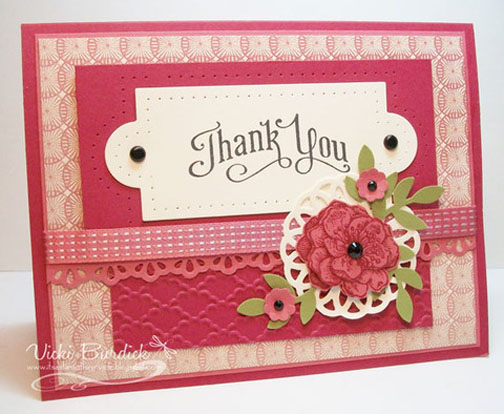
We are still going strong with our sketch challenge and this week's sketch is pretty fun!  I hope you have a few moments to play along.  With this sketch it may not take you more than that!

If you're gonna try going square, I recommend trying the 4 1/4" square size with this sketch.   You can easily use the focal point on a standard  sized card.  There's no rules!  If you are going 4 1/4" square, could still use the regular medium sized envelope.  You will have a little extra room, but wont have to pay the additional postage that's required for mailing a square card (sneaky sneaky selene'e).  Here's one set of potential measurements.  To find out what the operators did specifically on their creations, just link on over to them.

Base Layer: 8 1/2" x 4 1/4", scored and folded in half at 4 1/4"
Layer 2 and 3: 2  3/4" squares.  (the first one gets applied on the diamond, and the second is a square)
Layer 4: 2 1/2" square (attached on the diamond)

This is a super fun and whimsical layout!  I can't wait to see what you come up with when using it as a jumping off point!

Although we are "technically" on vacation, we still do hold true to our rules for play.  check them out at the bottom before you play along (please).

Let's see what the AMAZING design team has for you tonight!   


Are you ready to play along?  We hope that you are!  Here are our rules for play.
  1. Make a card using your Stampin' Up Supplies!
  2. Post it online somewhere to your blog or other online forum
  3. Post a link to the free linky tool below (please point the link to your post and NOT just your blog).
  4. Have some fun and leave comments for each other (and for the operators if you like their work). ~ Everyone loves comments!
  5. Please note, we reserve the right to remove links with non-Stampin' Up! product, "sales pitches", links to online stores, or requests to join your team. We're here to have fun, learn from one another and share.
We hope you join us this week and play along with this sketch! But don't delay our links will close at 8AM on Thursday morning Eastern Standard Time.

Rubbah hugs,
Selene Kempton

Friday, July 20, 2012

Saturday Sketch Challenge #265

Hello Stamping Friends! How are you this evening? We hope that you are doing fine and have some time carved out for this week's Saturday Sketch Challenge from the Stamping 411 Operators!

Before we get too far into the post, I need to share an announcement with you! This week is the beginning of the Stamping 411 "vacation". Now don't panic ... we'll still have a weekly sketch challenge. However, from now until the first week of September, we won't be posting any "extras" -- Color Challenges, Whatever Posts, etc. And the Operators will not be leaving comments on your blog during this time period. Well, some of us might but you probably won't see as much of us as possible. We need a little down time and thought this would be a good time to take some.

So, be sure and come back each week for the Sketch Challenge and to see the fabulous inspiration projects that the operators create! And look forward to some really cool things when we get back to full steam in September!

Now, for this week's sketch ...


It's pretty straight-forward this week. Just begin with your regular Card Base (5.5 x 8.5", score and fold). Add a strip in the middle (2" wide) and then a large circle or other shape! Now, you thought this was going to be more difficult this week, didn't you! Fooled ya!
 
And now it's YOUR turn! We can't wait to see where your creativity takes you this week! Just scroll down to see the inspiration projects from the Operator's this week! Click on their name to find out more information about their project.


Are you ready to play along? We hope that you are! Here are our rules for play.
  1. Make a card using your Stampin' Up Supplies! 
  2. Post it online somewhere to your blog or other online forum 
  3. Post a link to the free linky tool below (please point the link to your post and NOT just your blog). 
  4. Have some fun and leave comments for each other (and for the operators if you like their work). ~ Everyone loves comments! 
  5. Please note, we reserve the right to remove links with non-Stampin' Up! product, "sales pitches", links to online stores, or requests to join your team. We're here to have fun, learn from one another and share. We hope you join us this week and play along with this sketch! But don't delay our links will close at 8AM on Thursday morning Eastern Standard Time. I hope you have a fabulous weekend! Blessings, Gretchen

Friday, July 13, 2012

Saturday Sketch Challenge #264

Hello Stamping Friends! How are you this evening? We hope that you are doing fine and have some time carved out for this week's Saturday Sketch Challenge from the Stamping 411 Operators!


As you can see, there are some layers on this week's card. But, don't be intimidated by them! It's easy when you break it down into steps! Here are some measurements to get you started:

  1. Layer One -- Cardstock cut at 5.5 x 8.5", scored and folded to make the Card Base.
  2. Layer Two -- DSP cut at 5 x 3.75"
  3. Layer Three -- Cardstock cut at 2.75 x 3.25"
  4. Layer Four -- Cardstock (whisper white) cut at 2.5 x 3"
  5. Layer Five -- Cardstock cut at 1 x 2.75" -- attach ribbon over the "seam" and add embellishments and stamping!
See, that wasn't so difficult, was it?  And now it's YOUR turn! We can't wait to see where your creativity takes you this week! Just scroll down to see the inspiration projects from the Operator's this week! Click on their name to find out more information about their project.


Are you ready to play along?  We hope that you are!  Here are our rules for play.

  1. Make a card using your Stampin' Up Supplies!
  2. Post it online somewhere to your blog or other online forum
  3. Post a link to the free linky tool below (please point the link to your post and NOT just your blog).
  4. Have some fun and leave comments for each other (and for the operators if you like their work). ~ Everyone loves comments!
  5. Please note, we reserve the right to remove links with non-Stampin' Up! product, "sales pitches", links to online stores, or requests to join your team. We're here to have fun, learn from one another and share.
We hope you join us this week and play along with this sketch! But don't delay our links will close at 8AM on Thursday morning Eastern Standard Time.
I hope you have a fabulous weekend!
Blessings, Gretchen

Stamper's Showcase #263


 Thanks to all who played along with our challenge this past week. Here are your Operator Picks for Saturday Sketch Challenge #263!

Thursday, July 12, 2012

Finishing touches

Hi all! 

Vicki here, thanks so much for stopping by today,
 I don't know about you but I don't consider my card done until I finish the inside. What about you? Do you always finish the inside of your cards?

I thought I would show a few of my "finished inside and out" cards to give you some ideas for finishing yours.

This is a card I did last year around Christmas time:


While making my flowers for the front, I made another to use on the inside:


I generally start with a layer of colored card stock that matches some I have used on the front. In this case it is a layer of Crumb Cake and then I layered some Confetti Cream card stock and also some embossed Cherry Cobbler. I then added a strip of crumb cake across the embossed piece.
You could just stop here, I finish alot of my cards like this, using embossed card stock or DSP that matches some I have used on the front.
 On this card I added the flower that I had made that matches the one on the front. You can stamp a message on the inside, but I always leave mine blank for writing a personal message.

Here is another front:


and inside:

I used card stock and DSP like the front and then
 I die cut a couple of extra top notes to add to inside, to mimic the design on the front.
I also stamped a flower like the one used on the front. 
Leaving plenty of room for writing a note to the recipient.

Finally one more:


and the finished inside:


I hope these will inspire you to finish your cards "inside and out".

Vicki


Friday, July 6, 2012

Saturday Sketch Challenge #263


Hello stamping friends! It's time for another Saturday Sketch Challenge from the Stamping 411 Operators! We've got a fun sketch for you this week, one that you can make as simple or complex as you wish!


There really aren't any measurements for this week's sketch -- it's a wide-open canvas! All of the Operator inspiration cards began with a Card Base cut at 5.5 x 8.5" (scored and folded) and all added an additional layer cut at 4 x 5.25". From there, let your creativity soar!

Do you want to see where creative inspiration took the Operators this week? Just scroll down and enjoy! Click on any Operator name to find more information about their project!


Are you ready to play along?  We hope that you are!  Here are our rules for play.
  1. Make a card using your Stampin' Up Supplies!
  2. Post it online somewhere to your blog or other online forum
  3. Post a link to the free linky tool below (please point the link to your post and NOT just your blog).
  4. Have some fun and leave comments for each other (and for the operators if you like their work). ~ Everyone loves comments!
  5. Please note, we reserve the right to remove links with non-Stampin' Up! product, "sales pitches", links to online stores, or requests to join your team. We're here to have fun, learn from one another and share.
We hope you join us this week and play along with this sketch! But don't delay our links will close at 8AM on Thursday morning Eastern Standard Time.
I hope you have a fabulous weekend!

Blessings, Gretchen

Stamper's Showcase #262


It's been another great stamping week at Stamping 411! Thanks for all who played along with our challenge. Here are your Operator Picks for Saturday Sketch Challenge #262!


Thursday, July 5, 2012

Color Inspiration Challenge

For all our readers in the United States, I hope you enjoyed your holiday.  It was VERY hot here, but a good time was had by all at Bafoon Lagoon (our nickname for our pool).  In fact, we need to add water to the pool because 1.  the water was way too warm and 2.  the kids sloshed so much out from doing their cannonballs off the diving board!

On the first Thursday of every month, I am honored to present you with a brand new color challenge.  Since the new catalog has been out for over a month now, I thought I would slowly introduce you to the new 2012-2014 In Colors.  Today, we are going to play with one of my favorite In Colors:  Midnight Muse!!!!  If Night of Navy and Not Quite Navy had a baby, they might call it Midnight Muse.  Oh, it's such a beautiful color!!!!!


This month's color combination is:  Midnight Muse, So Saffron, Cherry Cobbler and Old Olive.  Of course, you can add any neutrals (white, vanilla, crumb cake) to make this combo work for you!!!

Now, I had to make a sample card for you!!!!  In fact, this is my mother-in-law's birthday card.  You see, my MIL loves the color red and she adores roses.  I grabbed my new stamp set called Stippled Blossoms and got right to work.  I do suggest using a Stamp-a-ma-jig to line up the roses perfectly.

I used Crumb Cake (a neutral) as my base card.

For the next layer, I ran a 4" x 5 1/4" piece of Cherry Cobbler cardstock through my Big Shot using the new Fancy Fan embossing folder.

Next comes my Midnight Muse banner element.  I simply took a strip of cardstock and cut the banner edge using one of my square punches!

For my newsprint layer, I ran a piece of First Edition Specialty dsp through my Big Shot using one of the Labels Framelits.  I dragged my Crumb Cake ink pad over this layer using the Direct-to-Paper technique.

My roses are stamped onto Very Vanilla cardstock using Cherry Cobbler ink.  Stippled Blossoms is a two step stamp set.  That means that it takes more than one stamp to build the image.  First I stamp the more solid layer.  I ink up this image with Cherry Cobbler ink, stamp off once onto scrap paper and then stamp onto my Very Vanilla cardstock.  Using my Stamp-a-ma-jig, I ink up the more detailed image with Cherry Cobbler ink and stamp it full strength.  The result is a very beautiful rose.  Each of the roses are cut out.

The leaves are also two step.  They are stamped just like the roses but using Old Olive ink.

Lastly, is the sentiment.  I inked up the "Mom" stamp (from the Family Reunion stamp set) using Basic Black ink.  I punched it out with the Large Oval punch and inked the edges with Crumb Cake ink.

All that's left are some Basic Pearls on the left banner edge.

I hope she loves her card.  Her birthday is tomorrow!!!!!

Now, it's your turn to play with this month's color challenge!  If you choose to play, we hope that you'll  link your card's web address to the Linky Tool at the bottom of this post.  This way we can all oooooh and aaaaahh over it!!!!